Using the Story Editor
The Klixo Story Editor is a powerful tool that may be used to add content to your website, or to edit existing content.
Before you start
Log in to the Klixo Website Manager at this address:
http://klixo.net.nz/klixo/
To create a new Story
- Click on the Stories button on the Klixo Toolbar
- Choose the Channel that you wish to create the new Story in
-
If you can see the Story Editor Mode option buttons:
- Ensure that the Story Editor Mode is set to "Beta" (figure 1 a.)
- Click the New Story button (figure 1 b.)
-
If you cannot see the Story Editor Mode buttons:
- Click the New Story button
- Type a Story Title for your Story
- Click Save
- On the Stories page, Ensure that the Story Editor Mode is set to "Beta" (figure 1 a.)
- Click on the Edit link alongside the Story, to edit the new story using the Beta Story Editor (figure 1 - c.)

Figure 1 - Story List
To edit an existing Story
- Click on the Stories button on the Klixo Toolbar
- Select the Channel that the Story you wish to edit is contained in
- Ensure that the Story Editor Mode is set to "Beta" (figure 1 a.)
- Click on the Edit link alongside the Story to edit the Story (figure 1 c.)
Story Editor Fields
When you create a new story or start editing an existing one, you will see the Story Editor webpage. Follow this guide for completing each of the fields on this page. The Story Editor also features interactive help that you can refer to when you get stuck. Hover your mouse over the blue question mark icon that is alongside the field you are editing for instructions.
Story Link
Every Story must have a link or URL that it refers to. This link can be automatically set to the URL of the Archive for this story, or manually set to any valid web address
Link to Story Archive: When this story is saved, a copy of it will be archived to the website and the URL of the Archive will automatically be used as the Story Link. This is the default setting.
Link to URL: By choosing this setting you may enter the URL of any webpage or document on the internet. For example a link to another website, or a link to another webpage on your own website. E.g. http://www.mysite.co.nz/
Story Title
Use this field to enter a title for the Story, e.g. "Latest News". This field is compulsory
Description
Enter a sentence or two text that describes the content of the Story. While this field is not always required, it is a good idea to complete it anyway to assist with searching and filing of the Story.
Start Date
The Start Date is the first date that the Story should appear on the website. There are two options for this field: "Today", or a date that you may specify in the future. If you choose a date in the future, Klixo will automatically start to display the story on the website on that date.
- The date may not be later than the End Date
- The date you choose must be a valid date, i.e. you cannot specify "November 31st 2006"
- By default, stories are listed in the order of the Start Date descending. The latest story will be listed first
End Date
The End Date is the last date that the Story should appear on the website. There are two options for this field: "None", or a date that you may specify in the future. If you choose a date, Klixo will automatically remove the story from the website after that date.
- The date may not be earlier than the Start Date
- The date you choose must be a valid date, i.e. you cannot specify "November 31st 2006"
- Stories that have expired (the End Date is earlier than today's date) will not display on the website, but will be shown in search results
Channels
Every Story must be assigned to at least one Channel. The Channel(s) that this Story is currently assigned to will be highlighted with dark blue.
Select a Channel by clicking on the Channel Name, the Channel Name will be highlighted dark blue.
Select multiple Channels by holding down the [CTRL] key and clicking on the Channel Name(s) you wish to assign this Story to. Clicking on a Channel again with the [CTRL] key down will de-select the Channel.
Custom Fields
Any fields that you may be able to see below the Channels list are Custom Fields. Refer to the description below each Custom Field name for instructions on how those fields should be completed.
Be sure to Save your story regularly by clicking the Save button at the top of the page. We recommend saving your Story every 10 minutes or so. If you have an unreliable or slow internet connection, save more often.
HTML Editor
The HTML editor allows you to edit the rich content of the Story similar to a Word Processor. To use the HTML editor, click on the option button labeled "Body Design" at the top of the Story Editor page (figure 3 a.)

Figure 3 - Story Editor
The HTML Editor consists of a Toolbar area and a Content editing area. The grey toolbar area allows you to format text and images using many features that are similar to popular word processing programs such as Microsoft Word.
The HTML Editor will always display text with no CSS styles applied. This means that the text that you type into the editor may be a different size, font or even colour than that which will appear on the website. This is normal.
Field Drop-down List (figure 4 a.)
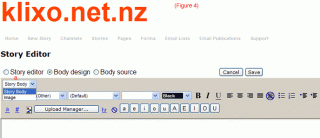
Figure 4 - Body Design Toolbar
Click on this drop-down list to choose which HTML field you would like to edit. By default "Story Body" will be selected.
Style Drop-down List (figure 5 a.)
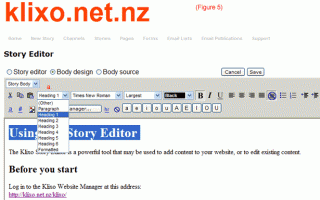
Figure 5 - Style selector
The editor allows you to choose from pre-formatted styles to apply to your text, such as headings. Select the text that you would like to apply this style to and choose the style from the drop-down box to apply it.
Link properties button
The Link button allows you to hyperlink text or an image to another webpage or document. To create a Link, select the text you wish to link and then click the Link button. The "Advanced Hyperlink Information" window will popup.
URL: Enter the fully qualified URL of the page or document to link to, i.e. http://www.mysite.co.nz/page2.html
Target: Choose the target window or frame to open this link in. The default is the current window (Not Set).
Other: This allows you to manually specify the name of the window to open the new link in (for advanced use only)
Title: Enter any text that you would like to appear as a Tool Tip when the mouse hovers the link (optional)
Click OK to apply the hyperlink
To edit an existing hyperlink: Select all of the hyperlinked text and clicking the Link button.
To Delete a Link: Select all of the hyperlinked text, hold down the [CTRL] key and press the [K] key. Delete the URL and click OK (Internet Explorer only).
Upload Manager Button
Click on this button to open the Upload Manager and view images and other objects that you can insert into your Story.
To Insert an Image into the Story Body:
- Position the cursor at the point in the Story where you would like the image to appear
- Click the Upload Manager button
- Select the option button below the image that you wish to insert
- Click the Insert button
Image Properties button
Use the Image properties button to set the border, padding and position of an image. Select an image by clicking on it once (handles will appear) and click the Image properties button. The Picture properties window will appear:
Picture Source: This is the fully qualified URL of the image on the web. This must be a valid web address. Do not use the Browse... button to set the Picture Source as this will only load images that are currently stored on the hard-drive of your computer, and therefore not visible on the world wide web.
Alternate Text: Alternate text is displayed when an image cannot be displayed, either because the browser does not support images, or the display of images is disabled, or the image cannot be downloaded due to an error. Accessibilty systems such as screen readers will also use the alternate text to provide information about the image to the visually impaired.
Alignment & Spacing: Setting the alignment will allow text to wrap around the image. For example, if you want the image to be placed to the right of a paragraph of text, set the image's alignment property to "Right". Set the spacing to keep a margin between the image and the text.
Border: If the image is hyperlinked, a border will be drawn around the image. Use the Border property to set the width of the border in pixels. Setting the border to "0" ensures that no border is drawn.
Remove Formatting button
Use this button to remove formatting from a selected area of text
Macron buttons
The Klixo Story Editor supports the typing of Māori macrons in text. Click on the appropriate vowel on the toolbar to insert a macron vowel, or use one of these keyboard shortcuts:
- [ALT] + [a] = ā
- [ALT] + [e] = ē
- [ALT] + [i] = ī
- [ALT] + [o] = ō
- [ALT] + [u] = ū
- [ALT] + [SHIFT] + [a] = Ā
- [ALT] + [SHIFT] + [e] = Ē
- [ALT] + [SHIFT] + [i] = Ī
- [ALT] + [SHIFT] + [o] = Ō
- [ALT] + [SHIFT] + [u] = Ū
Editing the content of a Story
Click in the top left hand corner of the large white area below the toolbar to begin editing your content. Type the text using the keyboard and use the toolbar to format your text. Most basic text formatting features such as bold, italics, underline, justification, bullet points, numbered lists and indenting are supported and should require no further explanation. Cut, Copy and Paste buttons are also provided. Most well know keyboard shortcuts are also supported including:
- [CTRL] + [x] = Cut
- [CTRL] + [c] = Copy
- [CTRL] + [v] = Paste
- [CTRL] + [b] = Bold
- [CTRL] + [i] = Italics
- [CTRL] + [u] = Underline
Copying and pasting text from documents and web-pages
Most text can be copied from other programs such as Notepad, Word, Outlook, Acrobat and Internet Explorer, and pasted into the HTML editor to become the content of your Story. When copying text from other programs it is important that only the text and not the formatting is copied. This is because the formatting used by other programs is not always compatible with web pages and may corrupt the published versions of the pages, making them ill-formatted or impossible to read. The simplest way to ensure that only plain text is copied into the HTML editor is to paste it in to Notepad first:
- Copy the text from Word, Outlook, or some other "Rich Text" application
- Open Notepad
- Paste the text into Notepad
- Select and copy all of the text in Notepad
- Paste into the HTML editor at the desired location
- Format the text using the Klixo Story Editor toolbar as required
See "How to correctly copy and paste text from documents and web-pages" for more information.
Save your work
Be sure to Save your story regularly by clicking the Save button at the top of the page. We recommend saving your Story every 10 minutes or so. If you have an unreliable or slow internet connection, save more often.
When you save, the Story will be published to the website. Publishing involves updating and uploading every page on the website that contains the Story that has just been saved and usually only takes a few seconds. If you do not wish the Story to appear on your website immediately because you are just saving a draft, set the Start Date to a date in the future. The Story will be saved and a Story Archive will be published, but the Story will not be linked from any page on the website. Note that the Story will still be returned by a relevant search query.
HTML Source
Click the Body Source option button at the top of the page to view and edit the raw HTML source of the Story. This is an advanced option and should only be used by HTML developers.


